Wednesday, July 8, 2009

Happy "Birthday" Darling!


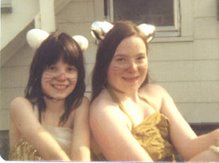
This is the day that James and I refer to as "Our Birthday." It's the anniversary of the day we met - the "birthday" of us. It's been 30 years today since that happened, and we still celebrate every year. This is the only photo we have of that day...


We met at a church picnic in Wisconsin - I had been forced to attend by my father, and James happened to be visiting his friend (the son of the couple hosting the picnic). We were introduced and chatted briefly. I thought he was cute, smart, and funny. Plus he had a nice butt (hey - I like what I like). After picnic food we were told we could ride the horses IF we could find them. They were nowhere around, so we decided to look for them. We had to climb through a fence to get into the pasture. Being a gentleman, he lifted the top wire of the fence and held out his hand to steady me. I took his hand and *ZAP* - instant electricity! We ended up holding hands for hours. We walked through the fields and woods. We walked along the road. We walked and talked all afternoon. At one point he picked a bouquet of wild flowers for me... I was hooked! I wanted the day to last forever.

Of course, eventually we walked our way back to the house - where we learned that the horses had found their own way home right after we left. We got into a bit of trouble for disappearing for the afternoon, but I don't think either of us cared. We rode horses for a while, just because... then he played his guitar and sang for me. I still remember myself as that young woman - completely smitten by this handsome "older" man who picked flowers for me and wrote songs and sang to me and made me feel like I was the most important person in the world...

...and to this day he's still that man. The man I started falling in love with on that sunny July afternoon. The man I married nearly eight years later. The man I miss even when he's only gone for an hour. The man I still want to fall asleep with and wake up next to. The man who still picks wild flowers and sings to me. The man whose hand I will always want holding mine as we stroll through life together.

I love you, James. Happy birthday to us!


Wednesday, June 24, 2009

Easy-Peasy Cheesecake

Ok - you can change the name if you like. But after you make it once you'll see that it fits (like the "Nummylicious Cheese Ball"). My older son and his friend wanted to make cheesecake last week, but none of us are crazy about the traditional recipe that uses 5 blocks of cream cheese. I thought maybe we could find a recipe that was at least AS good, and with luck it would use ingredients we already had in the house. After a short Google search we came up with three possibilities and combined them -- thus was born the following recipe.

Enjoy it - you can thank me later!

Easy-Peasy Cheesecake
Note: this makes a large cheesecake. I use an extra-big pie pan, but a springform pan would probably work well (although you might want to cut the crust back a bit). It would be deeper (and, thus, cheesecake-ier). Let me know if anyone tries it!


Crust:
2 cups graham cracker crumbs
3 tablespoons sugar
1/2 cup butter or margarine, melted
Crust: In a medium bowl, combine graham cracker crumbs and sugar. Add melted butter; stir to combine. Press crumb mixture into a 10-12 inch pie pan and chill for 30 minutes.

Filling:
12 oz. cream cheese, softened
2/3 c. sugar
2 eggs, room temperature
1 c. sour cream
1 tbsp. vanilla
Preheat oven to 350 degrees. Prepare crust, set aside. In large bowl stir together cream cheese and sugar until soft and creamy; then beat in eggs, one at a time. Stir in sour cream and vanilla; blend well. Pour in baked crust.

Bake 25-30 minutes until center jiggles slightly when pan is gently shaken (center will set). Transfer to wire rack. Let cool completely, cover with wax paper and refrigerate for at least 8 hours. Cut into wedges and serve. Makes 10-12 servings.

Monday, May 11, 2009

Who knew?

I learned a very useful tidbitof information yesterday that I thought I'd just quickly pass on. As you know I've been crafting and sewing and painting and building and creating. Just as I finished painting a bench for my entry the other day it started to rain. My older son, ever the gentleman, helped me carry it into the house and out of the rain. In the process he got a stripe of white paint on his brand new jeans. YIKES! Here's where the "tidbit" comes in. Are you ready?

HAND SANITIZER REMOVES DRIED PAINT!

I know - I didn't believe it either. This was latex paint that had been drying for about 5 days. Squirt the alcohol-based hand-sanitizer onto the paint and scrub gently with an old toothbrush. You'll see the paint just dissolve and disappear. You might have to do it twice, and you're going to want to wash the item afterwards, but it took the paint right out of the jeans. There: now isn't that something you can use?

disclaimer: you might want to test for colorfastness (is that a word?) and potential damage before you use this on a silk blouse or a hand-knit sweater or something, but on jeans it was amazing.

Tuesday, May 5, 2009

Save money! Be healthy! Have fun! Make your own granola!

I found this recipe in the Sunday Parade magazine a few years ago. I literally never read that thing, but I was bored... or maybe it was fate? We used to actually mail-order granola from Hobee's in Northern California because it was just the best. Believe me when I say: this is better!

Granola

Excellent
275°/1 hour total

In a large bowl, combine:
2 c old-fashioned oats
1/2 c wheat germ
2-3 T dark brown sugar
1/4 t salt
1-1 ½ c “extra” ingredients (sunflower seeds, almonds, pecans, coconut, etc) (NOT dried fruit)

In a saucepan, heat to a simmer:
1/4 c maple syrup
3 T vegetable oil
1 T water
flavoring (I use 1T vanilla and 1/2 T cinnamon, but you could use different extracts for different tastes)

Drizzle the liquid over the oat mixture and stir to combine. Pour into a greased/sprayed 9x13 pan, then squeeze by handfuls to form small clumps. Bake 30 min at 275 °. Stir in dried fruit (if desired) (1-1 ½ c total of banana chips, raisins, dates, dried cherries, etc) and bake another 15-20 minutes or until golden brown.

Let cool – can be stored in an airtight container for up to 2 weeks.

Note: I usually make a double batch of the dry ingredients and a triple of the liquid, because that’s how I like it. I also usually end up using about 1/2 cup of each of the “extras” – again, that’s our preference. With the bigger batch I use two large jellyroll pans for the baking (so it dries and browns better). As with most of my recipes, this one is pretty open to personal interpretation.

Monday, April 20, 2009

Latest recipe experiment - Cream Puffs

Cream Puffs (or Pâte a Choux) can be used for so many things. You can fill them with custard or pudding or whipped cream. You can top them with chocolate. You can use them as a main dish and fill them with crab salad or tuna or chicken pot pie... or you can butter them and just eat them. So versatile. So delicious. So easy... really!

Cream Puffs

Heat oven to 300 degrees.

Put one cup water, 1/4-1/2 tsp salt, 1 tsp - 1 tbsp sugar (depending on whether they will be for dessert or not and how sweet you want them), and 1 stick butter in a large sauce pan, and bring to a rolling boil. Remove from heat, dump in one cup of flour, and stir and stir until everything gets smooth and pulls away from the sides of the pan into a ball.

Return to medium heat to dry the paste so it will have the maximum puffing ability - turn the ball around in the pan, pressing it against the sides and flipping it over, until butter starts oozing out and the paste no longer sticks to your fingers. Let the pan sit for about 5 minutes while the dough cools, then stir for another minute or so to cool it some more.

Add 1 cup eggs (thats 4, in case you've never measured them) one at a time, stirring each until it is completely mixed in. (note: you'll get more *puff* if you use egg whites instead of one of the eggs). Continue to stir until everything is all mixed together (you'll see it change from a lumpy mess to a smooth dough).

Drop by spoonfulls onto greased cookie sheet (I highly recommend parchment paper). Place in oven on lowest rack and turn heat up to 400. It's the heat from the bottom that allows them to *puff*, so this is important. Bake for 15-20 minutes, or until they are puffed and browned. Decrease the heat to 200 and bake another 15-20 minutes to dry them more.

Remove from the oven and stab each one with a sharp knife. This puncture lets the steam escape so the insides dry as well. Now let them cool on a rack for about 30 minutes. At this point they can either be eaten or frozen. Don't try to keep them for more than a day, because they go bad pretty quickly.

Wednesday, April 15, 2009

Another Chicken Recipe

Apparently my family really likes chicken - it seems I'm always finding a new CHICKEN recipe to try...

Here's another one that they really liked. My darling husband says this one goes on the "make this again sometime" list. It doesn't really have a name yet, so if you have any suggestions I'm open.

unnamed baked chicken thing

Lightly grease/spray 9x13 pan
Place 4 or 5 boneless, skinless chicken breasts in pan
Top with a bag of frozen broccoli
In a saucepan, mix 1 container of Boursin "garlic and fine herbs" or "onion and shallot" cheese (I used chive and onion cream cheese, and it was excellent) and 1/3 cup milk until creamy. (*note*: you could use the LITE cheese and skim milk, too, and lighten the dish up quite a bit)
Pour half the cheese sauce over the broccoli.
Top with thin slices of ham, then the rest of the cheese sauce.
Sprinkle with 1/2 cup of Italian breadcrumbs and 3 T of Parmesan cheese.
Cover and bake at 350 for 40 minutes. Uncover and bake another 20 minutes or until the chicken is done.

I doubled the sauce recipe and served this with egg noodles. Even my younger son thought it was pretty good - and that doesn't happen very often!

Thursday, March 5, 2009

Lemon Chicken and fresh Lemon Curd

Just a quick post - I made this for dinner this week. Everyone LOVED it...except for my younger son. He said it was "too lemony." Whatever.

I'm eating the remaining lemon curd for a snack as I post this. Yummy!!

Lemon Curd

3 oz. (6 Tbs.) unsalted butter, softened at room temperature
1 cup sugar
2 large eggs
2 large egg yolks
2/3 cup fresh lemon juice
1 tsp. grated lemon zest

In a large bowl, beat the butter and sugar with an electric mixer, about 2 min. Slowly add the eggs and yolks. Beat for 1 min. Mix in the lemon juice. The mixture might look curdled, but it will smooth out as it cooks.

In a medium, heavy-based saucepan, cook the mixture over low heat until it looks smooth. (The curdled appearance disappears as the butter in the mixture melts.) Increase the heat to medium and cook, stirring constantly, until the mixture thickens, about 15 min. It should leave a path on the back of a spoon and will read 170°F on a thermometer. Don't let the mixture boil.

Remove the curd from the heat; stir in the lemon zest. Transfer the curd to a bowl. Press plastic wrap on the surface of the lemon curd to keep a skin from forming and chill the curd in the refrigerator. The curd will thicken further as it cools. Covered tightly, it will keep in the refrigerator for a week and in the freezer for 2 months.


Lemon Chicken

1 1/2 pounds chicken breast or chicken tenders, cut into chunks
1/4 cup all-purpose flour
Coarse salt
2 tablespoons wok or vegetable oil
1 tablespoon white or rice wine vinegar (a splash)
1/2 cup chicken broth or stock
8 ounces prepared lemon curd (1 cup)
1/4 cup hot water
1 lemon, zested
2 scallions, thinly sliced or 20 blades fresh chives, finely chopped

Coat the chunks of chicken lightly in flour, seasoned with a little salt.

Heat a large skillet or a wok-shaped nonstick pan over high heat with oil, about two turns of the pan. Stir fry chicken until golden, 3-4 minutes. Remove chicken from the pan and return pan to heat. Reduce heat to medium.

Add a splash of vinegar to the pan and let it evaporate. Add stock or broth to the pan and scrape up any drippings with a whisk. Thin curd by stirring in the hot water. Add curd to broth and whisk to combine. Add chicken back to the pan and simmer for 1-2 minutes to thicken sauce and finish cooking chicken pieces through. Remove the pan from heat, add the scallions or chives and zest and toss chicken pieces well to combine zest and scallions or chives evenly throughout the sauce.

note: I didn’t think this had enough “sauce” for my taste (and the rest of the family agreed). Next time I will double the amount – thus using the entire batch of lemon curd.

You can also BUY lemon curd, of course, and the lemon curd recipe can be used for a LOT of things besides this!

Thursday, February 12, 2009

Making Caramels

Apparently, for some unknown reason, the month of February has been "let's make caramels" month at our house. We've made three different recipes and tried different methods of cooking and timing and temperature. Here's the best and easiest one. I'm not saying it's the BEST caramel recipe out there, but it has to be close.

Memorize this - impress the heck out of your friends!

Mix together in a saucepan:
1 cup sugar (white is best, but you can use brown,a mixture, whatever you have handy)
1 cup light corn syrup
1 cup heavy cream (evaporated milk, 1/2-n-1/2, sweetened condensed milk - they all work)
1/4 cup butter (that's 1/2 stick)
1 dash of salt (that's about a shake from the salt shaker)

Stir well over medium/low and bring to a boil. Watch the heat and keep cooking, stirring often and watching so it doesn't boil over. Cook to somewhere between 245 and 250 degrees - lower is more like apple dip, higher is pretty hard. I like about 248. My candy thermometer says that's "firm ball."

Remove from heat and add 1 tsp vanilla (that's about a capfull from the bottle). Stir and pour into greased/buttered pan - 9x9 square or a pie pan will work great.

Let cool, cut, and eat (or just dip cut apples into it while it's still warm).

This takes about a minute to throw together and about 30-40 minutes to cook. If it's too soft you can throw it back into the saucepan and cook it again - just watch the temperature because it heats back up pretty quickly.

You could also get fancy - add pecans, make turtle candies, cook it to a higher temp and make toffee instead (note: I didn't actually try this, but it seems like it would work)... Be brave! Have fun! Enjoy -- that's what cooking is all about!

Saturday, January 3, 2009

New Year's Resolution

I make a resolution (or two) every year. Unfortunately, every year - like everyone else - I break it by February. This year I decided to make a resolution that I can't possibly break. It's simple, it straightforward, and it will benefit me and everyone around me.

DO IT BETTER!

That's it. Three simple words. Easy to remember, simple to do, and quick to embroider on a t-shirt (if I have the time). But think about the words: do it better...

I resolve, no matter what I'm doing, to do my best to find a way to do it better. Cooking? Find a way to make it more efficient or tasty, or just to focus on putting more "love" into it. Cleaning? Same thing - find a way to improve the process (even if it means blasting the music just so I have more fun). Talking to my kids? Make sure to listen more and not be as quick to solve their problems for them. Running errands? Perhaps I could be more patient with the people who park their carts diagonally and block the entire aisle while they debate the merits of Skippy versus Jif...

Each day I'm going to strive to find at least one thing upon which I can improve (see - I used the correct grammar in that sentence. I did it better!). With a resolution like that I know I can't possibly fail, and that means when the end of 2009 rolls around I will have succeeded at the ultimate goal: 2009 will, at least in some small way, be better than 2008. ...and if everyone did that, found one way to make one thing better every day, just think about what an amazing life this would be.

2009: DO IT BETTER!